
(Edited in order to add the images I previously included in my comment. You can safely ignore that comment now.)
I have been running into some problems drafting a coat pattern for my figure. I am quite slim and at the same time have much wider shoulders than what would be proportional.
The measurements I am dealing with are a chest circumference of 82-83cm (~32 1/2") and a point to point measure of about 45cm (~17 3/4"), if that is of any help. If I draft the pattern exactly to the system (using only my chest size) I end up with shoulders that are way too narrow. Ignoring that for now, this is what the pattern looks like, if joined at the shoulder seams. The run of the armhole is a nice, smooth line:
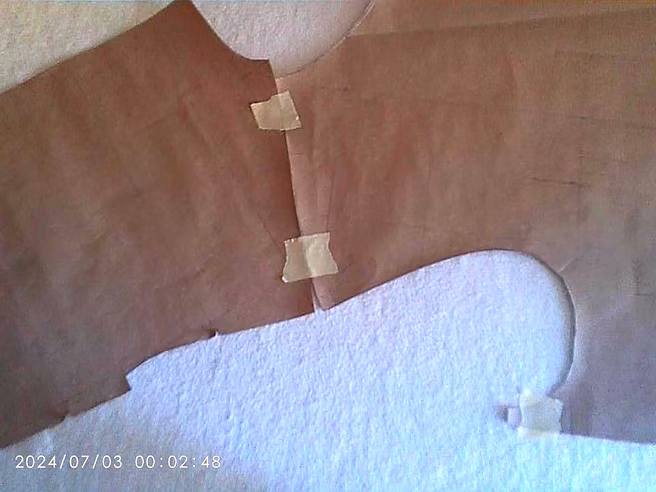
If I now increase the shoulder width (I also need to square the shoulders a bit) I end up with a very pronounced "point" when both shoulder seams are put together. Also, the armhole shape looks extremely wrong (the ends of the shoulder seams almost meet each other on top of the armhole). This is what that pattern would look like:
That would be a brief overview of my issue, here is a more detailed list of things I have tried or thought about (no particular order, just numbered for convenience):
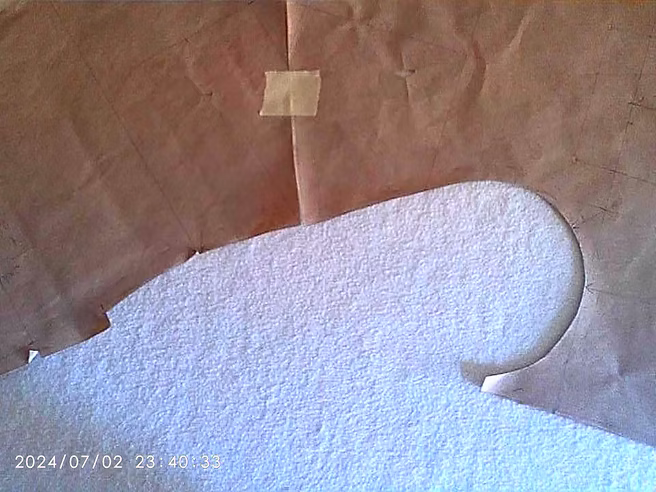
1. Just ignore the problem for now. When I get to the point of having joint the shoulders (on the actual coat) and I chalk on the armhole run, I smooth it out so it doesn't look pointy. This produces a convex curve on top of the armhole/sleeve seam. I did exactly that on the first coat I made and it kind of worked out (if you don't look at it from a weird angle). Still, I have never seen anyone do this and it seems incorrect to me, especially considering a sleeve has to fit in there. Here is a visualization of what that would look like if done on a paper pattern. The pencil line is the pattern as it was in the previous image and the white chalk line is what I would have done on the actual coat (ignore the line just outside the chalk line, that is a crease on the paper):
2. Increase the shoulder slope. That would indeed make the shoulder ends a little "softer", but is not applicable to my figure, since I have quite square shoulders. I did not even put a pad in my first coat (just the canvas over the shoulder) and still had to square the shoulder a little from the original draft.
3. Drop just the end of the front shoulder a little bit. I have seen this "dip" at the end of the shoulder in a lot of older drafting systems and it would have a similar effect to what I described in point 2, i.e. it would also take a bit of "pointiness" away from the shoulder tip. However I am unsure about the consequences of doing this, as no modern drafting system seems to do this anymore. Maybe this would work well for a more natural, unpadded shoulder? Jeffery Diduch seems to suggest this on one of his blog posts: https://tuttofattoamano.blogspot.com/2009/11/different-shoulder-types.html
Even so, that alone would not completely eliminate my issue.
4. Narrow the armhole. Between point 6 and point 19 on the draft 1/3rd scale is used. In some older drafts I have looked at this amount seems to be a little less. Could it be that for someone of my dimensions the chest circumference is distributed differently, i.e. more width on back and front and less below the armhole?
Still, narrowing the armhole would not completely solve the problem of the point that is created at the shoulder ends.
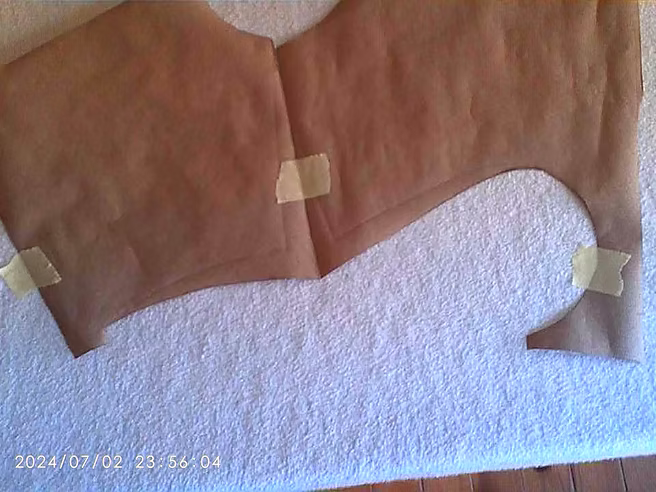
5. A more "Drape cut" style coat. I am quite interested in this cut and have read through quite a lot of material on it and I realized the typical adjustments that are made could help with my shoulder problem. So I drafted a pattern and made some of the suggested adjustments (in short, I cut a substantially wider back, I straightened the neckpoint quite a bit and filled in the front scye a little). This has been the greatest improvement so far, allowing me to have an almost straight armhole run when I put the shoulder seams (of the pattern) together. This is what the pattern looks like:
I am, in any case, quite keen on trying this one out, since it is a style of coat I really like. Still, what if I (or someone with a similar build) wanted a cleaner front and back and this solution was out of the question?
The position of the neckpoint seems to be the biggest issue for me. 1/6 Scale is less than 7cm (2 3/4") in my case, which just feels way too crooked.
The issue becomes apparent when I then draw out my front shoulder, which has to be at least 17cm (6 3/4", that is 16cm and one seam) long. Even 5mm or 1/4" less, like on my first coat, and my arm sticks out into the sleeve a bit. That makes the shoulder extend out from the front of the scye (vertical line from point 19 in the draft) about 10cm (4"), making it impossible to curve it back into the rest of the armhole smoothly.
The back shoulder is easier to adress by just widening the back, but I would like to know if there are better/different solutions.
Number 5 is my favorite "solution" so far. I was actually about to strike that pattern out, but decided to post my questions here before I do. I have an annoying habit of trying too hard to figure things out myself, even when there is a place I can ask for help, so I am trying to break that habit.
Some professional insight would be greatly appreciated!
(I realize this is a lot of text and some images might be helpful. I don't own a phone, so taking pictures and getting them here is quite a process, but let me know if something in particular would be useful.)
Looking at your profile picture reminds me of something from a tailor and Cutter instructor said, 189x? A straight line is shorter than a covered line. The "average" person has a little curve in the back more curve in the front. Both horizontal and vertical. You have a flatter back than normal. Most people if not normal are the other way. Looking at one of your pictures of the front and back patterns taped at shoulder and looking at the armhole I would pull the neck part away and overlap the sleeve end until that part of the sleeve cut is straight. I tend to the think that the back piece armhole should be shorter. I think the front piece the top of the lapel and gorge and shoulder neck point need to be lengthen/higher.
Tailors chalk the pattern then chalk inlays, lets say 3/4 to and inch. After cutting thread mark the pattern chalked. Baste for the fitting. The educated guess, called the pattern, may be off. Because of inlays you can shift the cloth pieces up down left right to find the best place on the body for each piece to fit and make the person look grand. After a good fit the paper pattern pieces are changed. After fitting don't be hasty trimming away excess. You may need to change parts when finishing the other parts.
If you slide your profile picture to the edge of the screen your back touches first. The seat is further away. If this normal stance some other seams will be changed. Inlays are a blessing.
I'd rather be as skinny as you than what my body has accumulated. 🙂
Sure thing! I figured that wearing a "close fitting" T-Shirt would be the way to go here, since I'm quite a stick figure and anything else would just be heaps of extra fabric covering up my actual figure. Anyway, here we go. Front View:
Since the folds of fabric around the scye might be a bit distracting, I thought the next image could help a bit. One line marks the end of my shoulder **** (I am very bony at that part, so locating that is not an issue), the other one the "end" of my chest. Both are approximations, of course, but should be about in the right place.
And here is the side view - tried my best to get the hair out of the way, it is getting a bit annoying at this point:
Lighting could probably have been better but I hope this helps. Let me know if you need something else.
Can we see a photo of you to better visualise your measurements?
Here is some information about Sleeves. Think it is part 60 about the shoulder being narrow and making the sleeve for broader shoulders.
https://web.archive.org/web/20150915030452/http://www.cutterandtailor.com/forum/index.php?showtopic=483
These have been done for styles, fashions and miss-cuts.
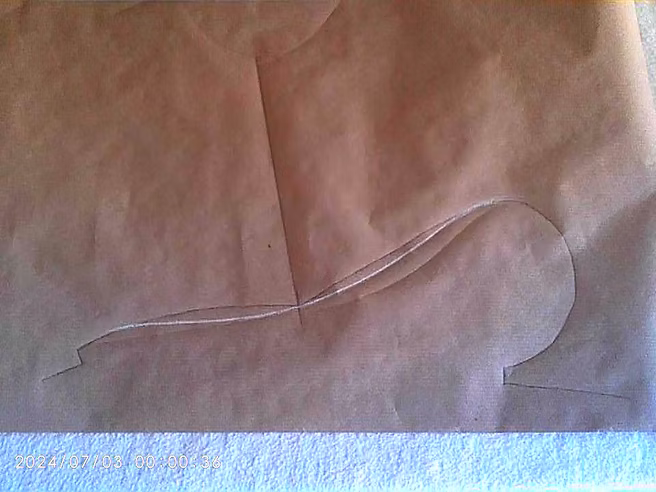
If you've just been busy and didn't have the time yet, please don't take this as me being impatient or trying to annoy anyone. But since you posted another comment a few hours after I replied to your first one and seemed unaware of my reply, I suspect that neither of my replies (which contain my measurements) might be showing up properly. If that is the case, I can try posting them as a comment (like this one) and see if that helps. On a related note, here is a picture of (the relevant part of) a pattern just flat on paper. I have applied my approximate half back measure on this one, sadly it does not solve my problem on the front around the armhole (which I had already realized when experimenting with the width of back):
This is the issue I meant when writing about the messed up armhole shape. Also, the "peak" at the shoulder is very apparent. It's what I always ended up with before trying some more "brutal" adjustments at the front, like moving the neckpoint a whole lot more forward. There is also a dashed line for your reference, which is at a right angle to the shoulder seam. Maybe this picture can provide a bit more insight, since I have only shared pictures of my patterns joint at the shoulders so far. Note that I have not done any adjustments other than applying the half back on this one. I think I should rephrase my issue, since this isn't really about very broad shoulders, more about a very slim figure with the shoulders of an average person - as you'll see from my measurements.
It sounds to me like you might be more than a 6" drop possible an 8", this is that your chest is like 40 and your waist is 32.
I am also assuming you're using 1/6th scale plus 2 1/4" for the back width and not a half back measurement. The former is great is you're making block patterns and the latter is when you're cutting a coat for a figure.
If you can provide me with your measurements I can have a go at the draft and see if I encounter the same issue.
Hey David,
Can you provide all your measurements for the coat.
I.e Chest, waist, seat, 1/2 half back, point to point, neck and height.
Forgot the sleeve cap/head. This coat at a museum, perhaps made in the 1880s, or 1920s, whenever, it is like the tailor shaped the top of the sleeve around part of a baseball, sized to fit the customer. Then, there was about an inch that went further up the shoulder. This is a Full Dress coat. Shaping the roundness at the top of sleeves is incredible shrinking skill. I'm 69 years old and seen various sleeve top come and go. My point is that today's sleeve heads are not the only one's. I've always thought of bespoke as unique and not copy everyone else. But do a good job for quality. The seam can be further up over the shoulder.
Skimpy cloths are harder to shrink and have limits.
You are a bit confusing.
For shoulder slope adjustment the easiest method, maybe, is to raise or lower the neckline and redraw the shoulder line.
The old pattern methods are showing to create a rounded front shoulder and a hollowed out back shoulder. The modern method, depending which one you add -subtract the amount you want. The back width migh be wider than the pattern for shrinking more cloth for the shoulder blade, muscles, whatever.
One method of creating a smaller front is to shift/move the front shoulder outwards on the back shoulder and trim away the excess down the front armhole. Below the armhole the width might need to be reduced towards the waist.
A rounded back means the front is narrower as described above (the line is more straight, which is shorter) and the back, being round is wider, therefore back width is longer across. But the neck hole stays the same. Back length, vertical, is also longer.
A trained eye, over decades, spot changes. The untrained eye absolutely depend on fittings. This is why inlays are so important.
These are some of the directions, others may pursue some different methods. These work for probably every style. Swell chest and drape are only two styles out of many. These styles have nothing to do achieving a good fit. Fit and style are two different subjects.
I luckily had some time to spare and took a few pictures. The quality isn't very good but I hope they help. First one here is the original draft of my first coat. The armhole run is overall quite nice and once I put in the fullness it was perfectly straight over the shoulder. However in the fitting I realized the shoulders were much too narrow and also not quite square enough.
So here are the according alterations I made (scrap piece of paper, but I think you get the point). The "peak" at the shoulder end is now very apparent.
This is a rough visualization of what I did on the coat to remedy the problem. The pencil lines are the pattern as shown in the previous image, chalk line is the armhole run I chalked on the coat itself (notice the convex curve I mentioned in point 1 of my post). Please ignore the line that is slightly outside of the chalk line, that is just a crease on the paper.
And finally this is the "Drape" experiment I mentioned in point 5. The shoulder width is just about right on this one, just a much wider back and straighter neckpoint. Again, once the fullness is put into the back shoulder, I think that armhole run will be completely straight. The small opening at the end of the shoulder is the "dip" I explained in point 3.
I hope this somewhat helps. Sorry for the walls of text, I just want to provide every detail possible.